
How to Create Transparent Background Using Photoshop
How to Create Transparent Background Using Photoshop
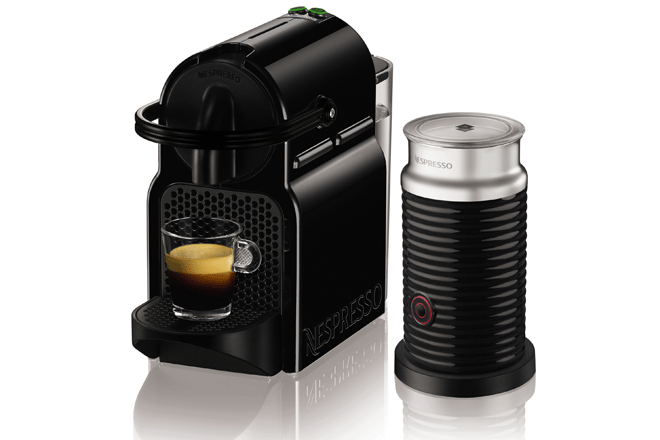
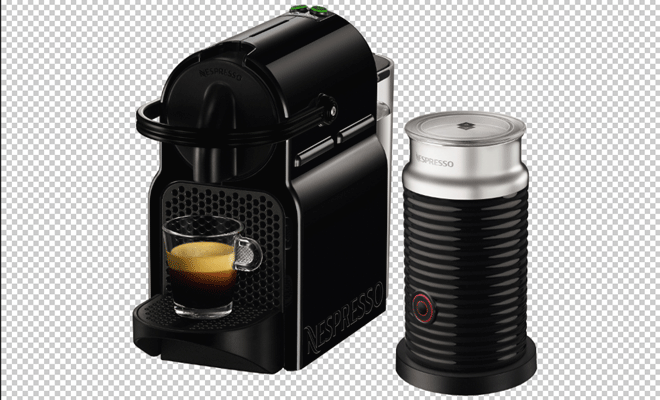
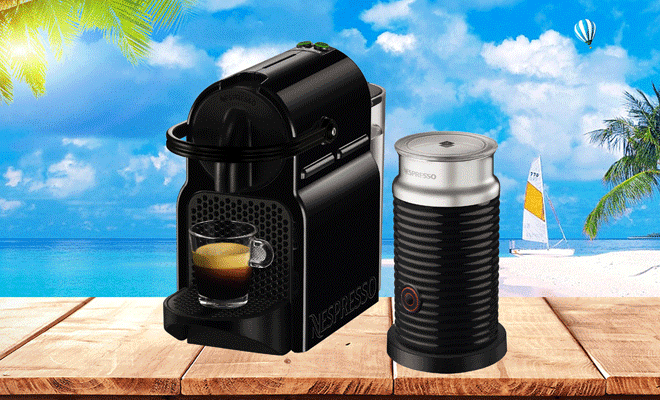
Creating a transparent background is not only the wondrous way to enhance the looks of the displayed products but also an interesting thought of presenting the showy display option of the featured products. It clearly makes the featured products presentable in looks by giving the background that has the potential to change the colors effectively. Rest based on the user’s screen size it interacts differently than the background the product normally has. It also makes the user able to place the website’s logo files anywhere on the site without concentrating on the color of the page background.
Just five simple steps ahead and creating a transparent background with the help of Photoshop will become effortless for you. So have a quick reading on the below-given steps mentioned below
Steps to Create Transparent Background in Photoshop for the Product Image
1. Create a layered file of the image
The first step starts by opening the image into Photoshop in JPG format.
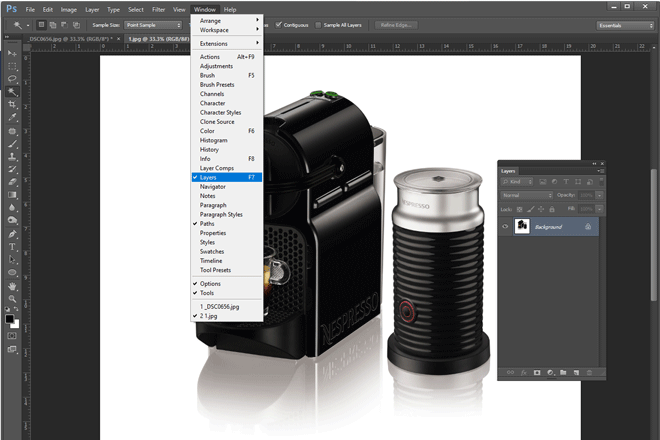
Now use the layer panel resting by default in the right of the image window. If you are not able to find the layers panels then it can be easily accessed by the clicking on the options window and then go to the layers option from the menu displayed on the top of the application window.
Now use the background layer option by double-clicking on it and a new layer will be in front of you. You can rename the new layer or can leave it as it is and then press ok. After going through the step unlocking the background layer is possible and you get the transparent background look when you delete anything from it.

2. Create selection
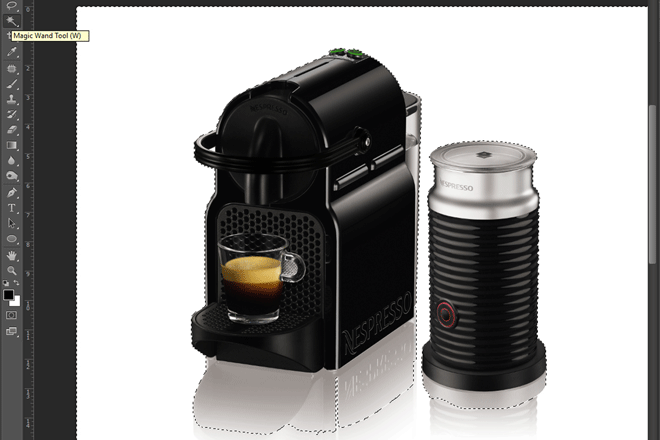
Now the turn is to select the object but not with the background. Selection of the object is possible by using the magic wand tool available on left side of the application window in the toolbar. When the option has opted it will look as the marching ants that basically encircle the object.
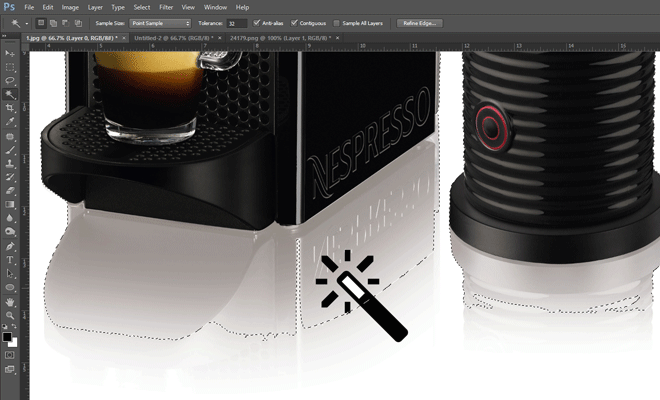
These marching ants will show the selection of the object and the user can easily add more products or remove the background if he finds the selection not as so perfect. For this purpose subtract from selection icon is there in the options bar.
3. Delete Background
Now you just have to delete the background by simply choosing the option select and then inverse from the menu located at the top of the application window. The inverse can also be selected by typing the Shift+Ctrl+I .

Now type Backspace with the selected inverse. This will make the background transparent that is pictured in the white and grey check pattern. Use Ctrl+D if you want to deselect the selection.
4. Save the image in a proper format
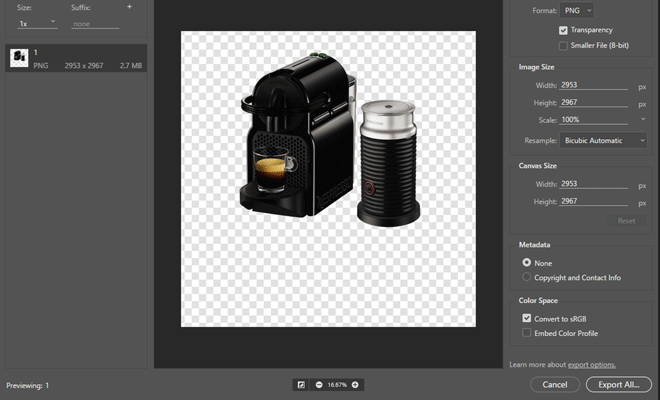
Saving the image in the correct format is vital for displaying it with a transparent background on the e-commerce website. The recommended format for saving the images is Png-24 never letting the pixelated halo while placing the images on the different color background that is possible in the other formats like the png-8 and gif. You can save the file using png-24 by using the shift+Alt+Ctrl+W or you can go for the options like file then export and then export as using the same dropdown menu available at the application window.

Then set the format to png by using the file settings option in the right-hand side of the box and don’t forget to check the transparency box once. Try to keep the file size around 200 kb or maybe smaller to have a quick load of the pages. So adjust the dimensions accordingly. For a better response from the customers make sure to keep the image size 50 or 100 percent larger than the size than the expected one. In short, manage your images in a way that minimize the load time by surely minimizing the file size of the images.
5. Save your file
After proper balancing of the images and setting correct dimensions you have to go for the option export all and then use the option save from the dialog box and put the image saved in some optimized image folder that is bit separate from the other ones and now name the image file by using the extension .png and then press save.
How to Make a Transparent background for a logo in Photoshop
Creating a transparent background for logo increases the flexibility of the logo. This enables the user to display it anywhere on the site irrespective of the color of the background.
Steps to create a Transparent Background logo using Photoshop
- Open logo in Photoshop
- Make the image background transparent
- Save your image as a PNG file
Step 1: Open logo in Photoshop
The first step begins with opening the logo in the Photoshop by using the option file and then by using the navigation option and then click open. The format of the file must be suitable for the Photoshop or else you have to correct it by using proper settings from the dialog box. Then click ok.
![]()
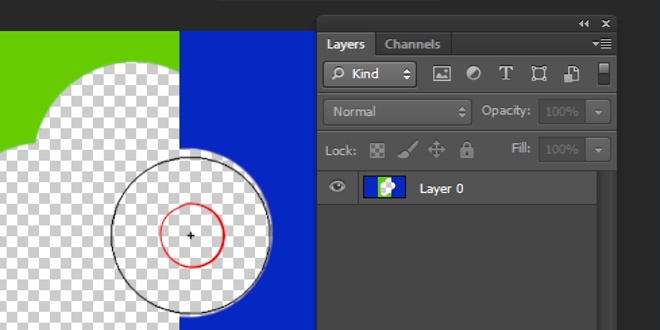
Step 2: Make The Image Background Transparent
This step is basically for the ones who are working with the JPG format. It is necessary in this case to select and delete the background from the image. Steps will be like double click the background layers and then press ok for the conversion of the background to layer 0. Selection of the logo file is bit different so for the selection purpose choose the Magic Wand tool and then click on the white background of the logo file and for the selection of the multiple areas just hold the shift key and then use the Magic Wand tool to add the selection. ![]()
After that Press Backspace after selecting the entire background. That’s it your transparent background with the grey and white check pattern will be achieved after this step.
![]()
Step 3: Save the image as a PNG file
Saving of the image in the proper file format is basically the next step. Saving of the image will be done in the same way as mentioned above. You will notice that the smaller file size comparative to the transparent product image but you need not change the dimensions of the original file and save the logo file as it is.
That’s all now you got the entire knowledge of creating the web-ready images for the e-commerce websites with the transparent background that are capable enough to make your website presentable enough for the visitors without slowing down the site.

Here are the Steps to Remove Background of an Image
To remove background of an image, it is essential to use professional services. It is because, image background removal needs skills and expertise or else the whole image will look bad. Replacing the backgrounds or completely removing them is not everyone’s cup of tea. If you want to remove the backdrop, you need to keep patience and use Photoshop as it is loaded with a number of background removal tools. An attractive and professional image looks beautiful with transparent backdrop and to make your online business a huge success, do consider using background removal methods.
What is background removal?
Removing the background implies erasing the unwanted areas of the image. When an image has bad background, the whole image looks dull and boring. To lend a vibrant and bright appearance, the background is removed and replaced with a new white background. For an example, if you are using images for online selling portals, white backgrounds are must because they have a soothing effect. Also, the viewers feel more connected as the backdrop looks exciting.
Here are the tools used to remove backgrounds:
- Background eraser tool
- Channel masking
- Pen tool
- Clipping path
Categories of Image Background
For background removal and deep etching, Photoshop is brilliant software. To get the best quality results, clipping path and image masking methods work best. These are the categories of image background removal:
Basic shaped
To remove backgrounds of simple shaped images like round, straight, rectangular, and curved, pen tool is used with less than 6 anchor points. The examples are ring, book, spoon, mobile, ball etc.

Medium shaped
Multiple paths are used to remove backgrounds of medium shaped images. Products like bracelets, group rings, group shoes, group watch etc. are medium shaped objects.

Complex shaped
Complex clipping path is applied to the complex images like furniture, furry doll, group images, chain, group bracelets, net, and cycle etc.

How to remove background from image?
Depending on the complexity of the images, different methods of background removal are used. To make the images look enhanced, background removal has gained worldwide popularity.
Removing simple background
- Open the image in Photoshop for which you want to remove background. Make sure the background is in single color
- Go to Layers window and click on the layer. Right click on the layer and then layer from background. Since the background layer is locked and you cannot make changes, changing it to layer from background
- Pick magic eraser tool from the tools palette and set the tolerance to 20-30. Check the anti alias and contiguous box and ensure the tolerance is low. Check mark the opacity and set it to 100%
- Now click on the background and remove it
- Once when you are done, zoom in the image and make minor adjustments
- Now pick lasso tool and draw a rough outline around the image. Create new layer by clicking on new layer via cut after pressing Ctrl+Shift+J
- Save the new image
Removing complex background
- Open the image and take background eraser tool from the tools palette
- Choose the brush option, set the hardness to 100%, make the limits contiguous, and tolerance value between 20 and 30. The limits rub the background only and keep the color of the image intact
- Bring the mouse pointer to the area and start clicking
- While clicking, you will see the background getting removed and a checkboard will appear symbolizing transparency
- When you are done with background removal, pick the smudge tool to make the images smooth. Set the strength to 20% and drag the tool around the edges. Save the image in any desired format
Benefits of Background Removal Service
There are multiple benefits of background removal service among which ecommerce business is benefitting a lot. Let us explore the many benefits of this service for various niches:
Professional photography
To keep up with the professionalism and expertise in photography, background removal service holds a significant place. In the digital world, everything is about photography and the photographers have to go through various challenges to stay ahead of the competition. In order to get perfectly desirable results, background removal service is must. The images look premium and attractive when they have nice backgrounds.
Product photography business
Online businesses are trending giving much importance to product photography. If you want to capture the users’ attention, you have to design gorgeous photos so they feel good while exploring the site. Usually, the product photos have white or transparent backgrounds and to achieve such results, image background removal is done.
Ecommerce
Ecommerce businesses are gaining much appreciation from across the globe due to the ease of shopping. Everyone shops online instead of going out in the brick and mortar stores. First, the online portals offer good discounts and there is no wastage of time. Now talking about the image background removal service, it gives a new shape and dimension to the pictures. The images are edited and the backgrounds are removed which give bad look and new backdrops are added to compliment the overall image. To sell more on the online portals, image background holds a special place because only the beautiful images can attract people. However, background removal service comes in handy to remove unwanted areas of the pictures and display the object at its absolute best.
Avail best background removal services
To apply proper background removal method, you need professional services from the experts. Clipping Path King is a photo editing company having a team of experts who are well versed with the techniques of background removal. They put in their complete efforts to deliver you the desired results and that too at affordable prices. Removing the backgrounds of the images is a challenging task because there are so many things to take care of. While removing the background, you get to erase the object as well by mistake. However, you need to avail the expert services to make sure everything goes right. Clipping Path King works with dedication so as to remove the backgrounds the way you want and send the images back with stunning results. Every image is individually checked for quality before delivering and made sure that you get what you pay for.
To get an idea of the quality you will get, Clipping Path King offers free trial service. Assess the skills by sending few images and check if their background removal services meet your requirements. The trial service is free of cost that helps you take a fair decision whether or not you want to avail their services. Once when you are completely satisfied with the results, you can place the order for as many images as you want. Plus, you can also get discounts on bulk orders and they make sure you get quality work.
Conclusion
No matter which company you choose for background removal service, just make sure to check the testimonials and previous clients that particular company has worked with. Do proper research on the internet to find out which companies have the best services and then contact few of them. Pick the one which suits you best.

Here is the list of Amazon Image Requirements to Optimize the Images
Amazon is a great platform to list your products for sale but there are few requirements you need to fulfil before uploading the products. These are the image guidelines which are important to follow if you want to use Amazon as your selling partner. It is essential because hundreds of sellers are listing their products at Amazon so it has laid down some requirements i.e. image resolution, background color, image size, consistency in the image in terms of dimensions and much more.
These tips will help you create stunning product images which will surely bring you more business as the viewers like clean and crisp product photos to reach to a final buying decision. Optimizing product photos is significant because they are the major source of sales and also they show up in search results. Would you like showing bad photos on the portal or search results?
Here are the guidelines you should follow to create incredible product images:
Tips for optimizing Amazon product images
- Follow the Technical requirements For Amazon Image.
- Use many images for a single product
- Follow the standards of Amazon for High quality images
- Add offer Level of images
- Use different angles of product photos
- Pay attention to lighting and important information
- Focus on the frame
- Add video
1. Follow the Technical requirements For Amazon Image.
Every image has technical details like the size, background color, frame, color mode, and file format etc. All these details must be up to date and consistent so all the images look similar to the viewers. While setting up new product pages, you should adjust all these factors. If you fail in doing so, Amazon will not accept your images and so you will lose one of the best selling platforms.

Image size: If you want to sell on Amazon, the images must be at least 1000 pixels either in height or width. The recommended size is 2560 pixels.
Image frame: Next, the image must fill 85% to 90% of the frame and the product images must have white background, it’s important, no other color. Next, is the file format which should be JPEG, TIFF, GIF and PNG that all the images must be in. Talking about the color modes, both RGB and CMYK are acceptable at Amazon.
File format: Then, we have is file names of the images. There is a product identifier i.e. JAN, EAN, 13 digit ISBN or ASIN on Amazon. Next, is the file extension i.e. 123347565.png which must not have any spaces, dashes or any other characters. Also, there should not be any logos, symbols, watermarks or text on the images if you are uploading on Amazon.
2. Use many images for a single product
For products to display on Amazon, it is important to upload 6 to 7 images of a single product. It is because the viewers can see every side and aspect of the product they are going to buy. Using two or three images is fine but having more is always better. Use as many images as you can to show front, back, upper, lower, sides and interiors etc. With more images, you can show them all the possible angles and they can get an idea whether or not a particular product is suitable for them.

Next, it is essential to set priority for the images while uploading on Amazon. Assign the priority i.e. the correct order in which the images are displayed. Assign number 1 to the complete product and then move on to the front, back, sides, and close ups of the product.

Follow these Photography Solutions for Best Pictures
Clicking professional pictures is not that simple and to get the creative shots, you have to follow some tips and tricks. To take your photography to a whole new level, these photography hacks will help you and give wonderful shots. Are you a budding photographer or a professional photographer? Actually it doesn’t really matter because these photography solutions will make a nice choice for everyone. Check them out:
Set up the camera and location beforehand for Better Photography
It is always best to set the camera and decide the location before you start clicking the pictures. Take a decision which location and background you want for your image and once you are done with this, it would be easier for you to click the pictures. Plus, there are many factors like auto mode, white balance, contrast, sharpness, etc. which need to be adjusted to get the best shots ever. When all these settings are done, you don’t have to set it over and over again for every picture, all you need to do is click the pictures at once and then check the results.

Shoot the image from close for clear Photography
Sometimes, it is required to Photography the picture from a distance but when it is not, make sure to go to the object as close as you can. Also, you should take care not to zoom in the image as it will distort the object and make the whole image look bad.

Focus on the frame to Take for best view in Photography
There might be distracting elements in the picture which should be avoided taking in the frame. While clicking a picture, make sure that only the necessary portion is shown to the audience. You don’t need to show everything when a portion is enough to be showed. If you want to show everything, it would be better Photography clicking different pictures separately and create a nice story which people enjoy.

Lighting is important for Professional Photography
The pictures look gorgeous when taken in best lighting of Photography. Don’t click the images in too much sunlight and also not in the dark hours. The time around dusk and dawn is suggested to take warm shots which look soft to the eyes. Also, in these hours, you can highlight the important details which generally don’t come in the picture due to bad lighting conditions. If you are shooting indoors, then use reflectors and when photography the cast lights to bring out the best of every picture Photography. Make sure not to shoot any weird shadows with the images if they are not looking natural. Also, depending on the nature of the subject, you should click the pictures Best Photography.
Conclusion
To sum up, we would like saying that by following these tips you will achieve stunning results. These tips are quite helpful as they give you better control over the pictures and let you work on the images in an appropriate manner. Achieve the desired outcomes by using photo editing services which further enhance the overall appearance of the pictures. If the images look bad, have spots, blemishes, patches or anything on the image which ruins their appearance, photo retouching and editing comes in handy so set your requirements and avail the best services now.

Jewelery Photo Retouching Guide – Chapter 1
Whether it is man or woman, everyone loves wearing jewelry items. Jewelry is the precious thing as it contains expensive diamonds, gold, and silver metals. Buying of jewelry itself is a challenging task as there are lots of nits and grits to be considered. While there are lot of factors …

Jewellery Photo Retouching Guide – Chapter 2
There is a massive demand of digital cameras over the past few years and photographers weigh on DSLR cameras or mirrorless cameras for jewelry photography. Many modern-day cameras can do the job, but what makes Nikon D3400 stand out for jewelry photography is its flexible shutter speed and aperture settings …

How to Use the Background Eraser Tool In Adobe Photoshop
Background eraser tool is quite a helpful tool in Photoshop which is used widely to retouch the pictures to make them look good. To remove the unwanted areas of the pictures, background eraser tool works just fine. The images having fine detailing or unwanted backgrounds are corrected and edited using background eraser tool. Other than this tool, there are many other tools like clipping path, magic wand, and pen tool etc. which are used to cut out the object from its respective background.
Image masking is also an ideal method for image background removal which works on the complex backgrounds or edges. The images having furry edges or hairy backgrounds are better dealt with masking method. The importance of eraser tool is not unknown and everyone in the photography or graphic industry is using this tool on a wider note. This tool helps in cutting out the backgrounds and new backdrop is added according to the image requirement. By using this tool, you can erase the areas which are not required whilst leaving the other important areas untouched.
Here are the steps to follow while using background eraser tool. Let’s get started:
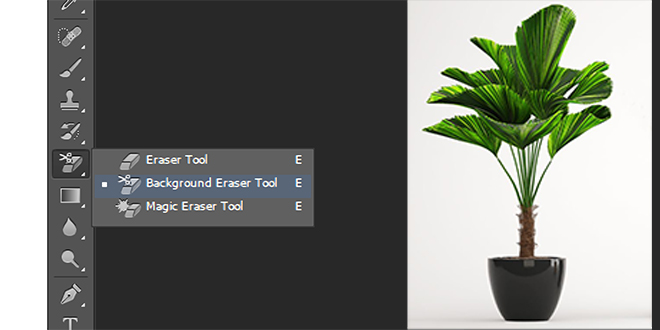
1. Pick the Background Eraser Tool for Remove Image Background
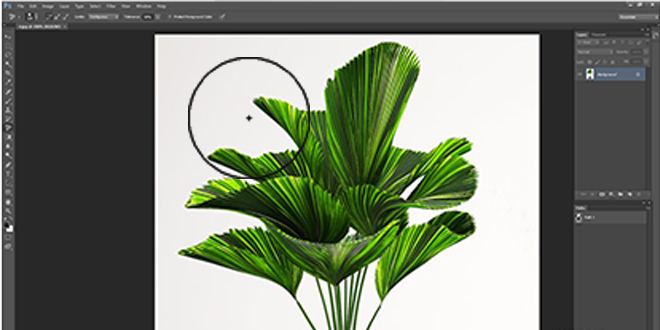
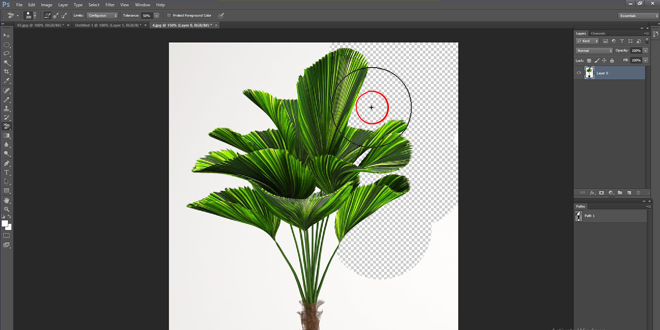
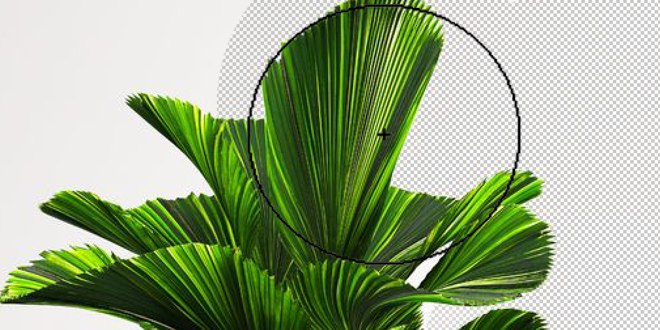
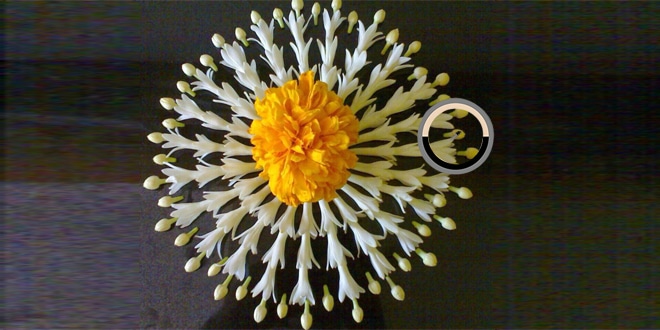
Open Photoshop and select the image you want to remove the background from. Open the image and you will see it in the display window. Go to the tools palette and pick the background eraser tool from there. When you pick the tool, the mouse cursor will change to a circle with cross hair in the center.
Pick the Background Eraser Tool
Now depending on the areas to be removed, you can change the size of the eraser. For that, press [ and ] key on the keyboard respectively. Next, press shift + [ for softer edges and for harder edges, press shift + ]. We suggest going for harder edges for better results.
Set Up the Background Eraser Tool in Adobe Photoshop Video Tutorial Bellow
2. How to Work the Background Eraser tool In Photoshop
You might have noticed that when you open an image in Photoshop, it creates a layer which is locked and generally sits in the background. To start working or editing it, you have to unlock the layer first.
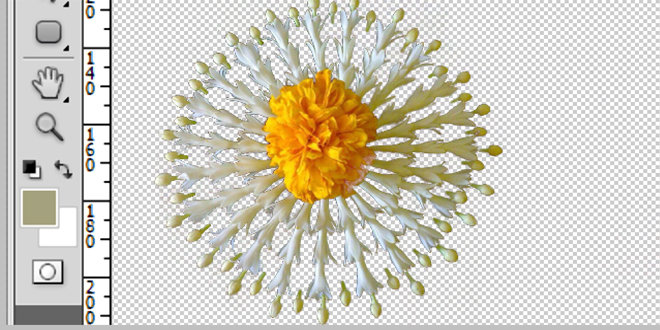
Coming to the procedure, pick the eraser tool and drag it over the areas you want to remove. Wherever you drag the tool, it will remove those areas by sampling the color beneath the target symbol.
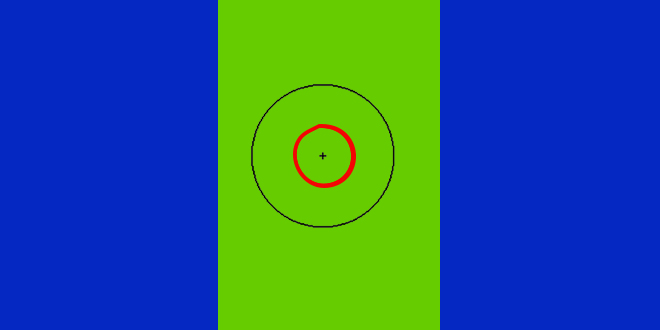
Target symbol denotes the area where the pixels will be removed from. It is encircled with large circle and any pixels located under the target symbol when match the color of the pixels are erased by the background eraser tool.
When you start removing the areas, it might happen that any other area you don’t want to remove gets erased accidently. If it happens, press Ctrl + Z to undo and if there are more undos, press Ctrl+Alt+Z to go back to the step where you did the mistake. Now start erasing once again with the same method.
Background Layer
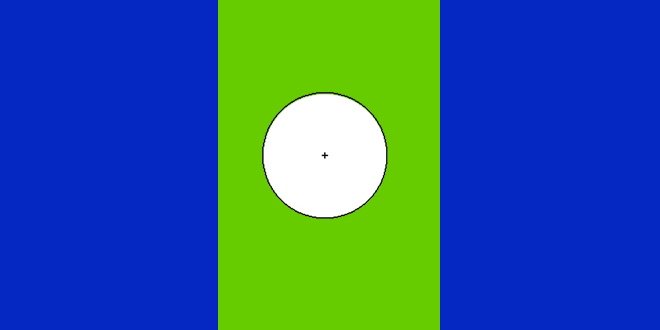
Working on the background is not possible because it is locked by default. While dragging the eraser tool on the image, you will see that there is no difference in it. It means that the layer is locked and is the background layer. Photoshop sometimes automatically transforms the background layer by unlocking it and name it layer 0. Since erasing pixels on the background layer is impossible because of being locked, you have to unlock it if Photoshop doesn’t do it for you.

How to Work the Background Eraser tool In Photoshop Video Tutorial Bellow
3. An Example of Background Eraser Tool Action in Adobe Photoshop
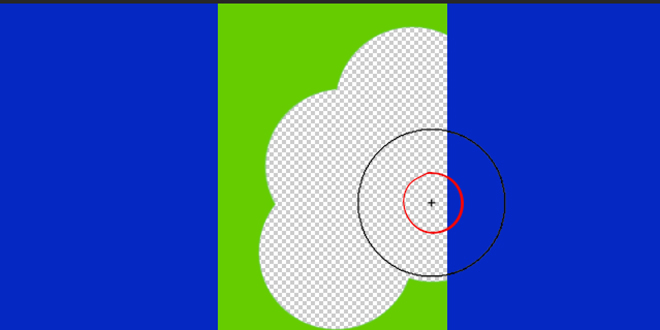
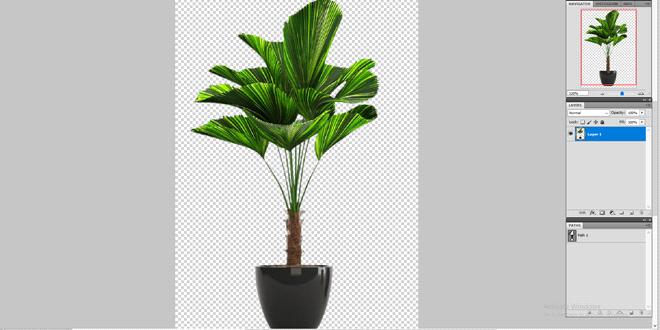
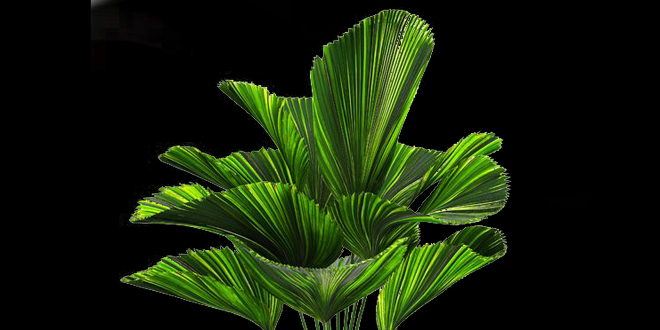
Now let us move forward to erasing the background with an example. As you can see this picture has blue sky which you want to remove. Drag the eraser tool over the sky and removing it is the simplest thing you will do but if you see, there are trees around and accidentally you will remove the trees as well because they are in the same layer. Now to deal with that, you have to be careful with the target symbol and keep it on the blue area i.e. sky in order to prevent removing the trees.
The background eraser tool samples the color underneath the target symbol which is at the center of the eraser. When you drag the eraser, be careful about where the target symbol is.
To work properly with background eraser tool, here are few settings which will do wonders and make the process perfect to deliver great results. Navigate to Options bar and choose:
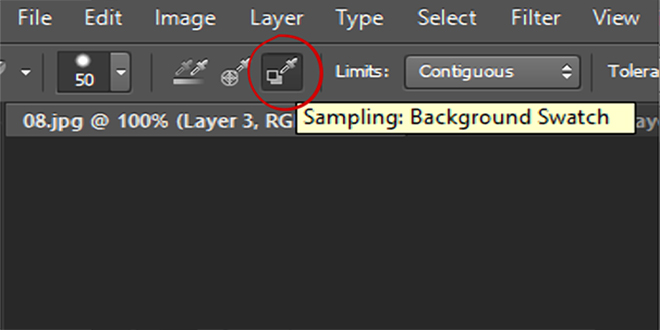
Sampling Options of Background Eraser Tool Action in Adobe Photoshop.
You will see three options i.e. Continuous, Once, and Background Swatch to the right of brush preset picker. It will help control the behaviour of the eraser. The default option is the continuous one which samples the area where the symbol moves.
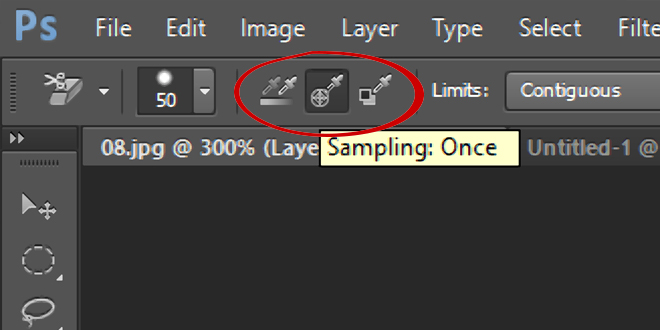
When you have too many colors to erase in a single image, Continuous option is the best. It allows you to complete the process smoothly and lets you go with the flow. In order to remove the blue color or any other color, keep going and it will keep erasing the area without any hassle. But make sure the target symbol is over the same color you want to erase. If the target symbol shifts to another color, the tool will erase that color in that case.
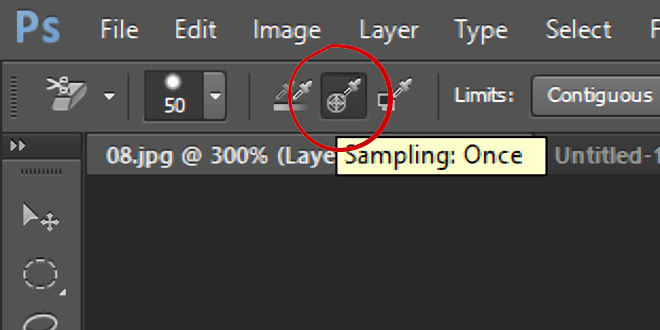
Once option is for simple images in which there is only one color. Even if you move the target symbol somewhere else, it will not erase another color so you need not worry about erasing the required area accidently. The moment you click on a color you want to erase, Photoshop will record it and helps erasing it properly.
Background swatch is for those people who cannot position the target symbol properly. Choose any similar color you want to erase and Photoshop will do it accordingly.
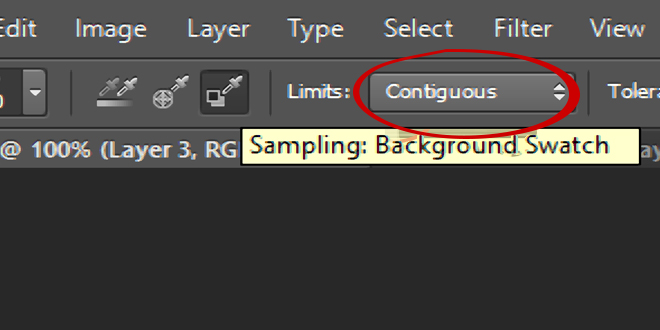
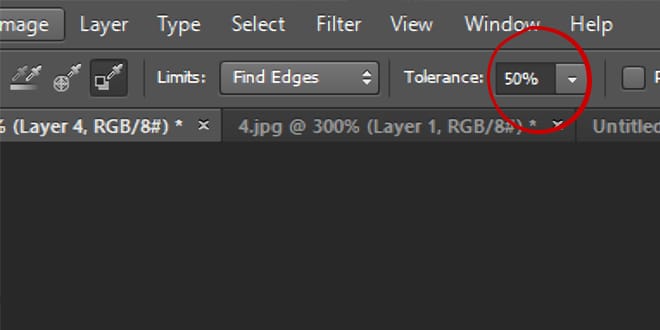
Limits
Now coming to the limits, it has contiguous and discontiguous options. Both these options tell Photoshop about the pixels which need to be erased. Discontiguous option is helpful in erasing the pixels where there will be matching sampling color and contiguous option removes the pixels which touch the target symbol.
Do you have a complex image? The area you want to remove is hidden under another area and removing it is a little tough, right? Here discontiguous option will work as it will not affect the other areas and simply focus on the matching color to remove it. The combination of Once option and Discontiguous option is suggested to achieve brilliant results in such images.
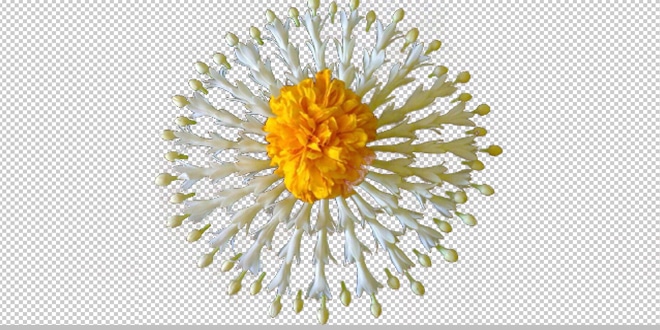
When you are erasing the areas, always check the final view after zooming in. Check whether the areas you want to remove are properly done or if there is anything left. Even when the limit is set to discontiguous and Once option is chosen, there are some areas which can be left. To help with that, zoom in the window and see where there are few areas left. Then, you can work on those by switching to Tolerance value.
Tolerance of Background Eraser tool
Work with tolerance value to get clean and crisp results. Working with similar colors can be cumbersome because sampling one color might sample the similar color and doing it all over again makes things tough. When you get to work with similar colors, lower tolerance setting is suggested. Change the value from the dropdown menu located right next to Tolerance menu.
Set the tolerance level according to the different color tones. If the image you are working on has different colors, then tolerance level must be set to higher value and vice versa.
Example of Background Eraser Tool Action in Adobe Photoshop Video Tutorial Bellow
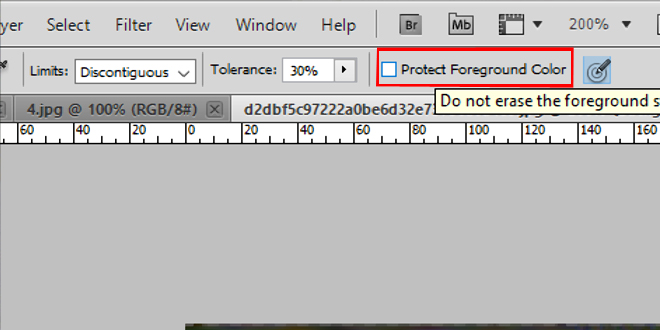
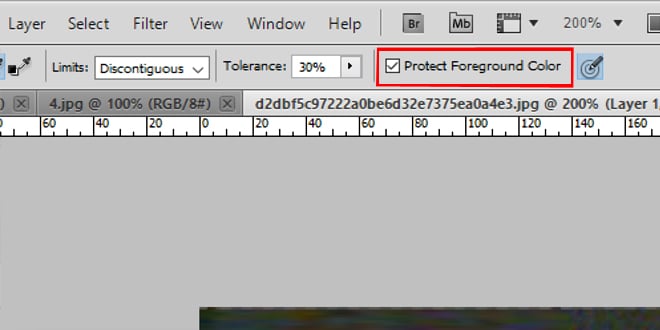
3. Select Protect Foreground Color for remove Image Complex background
To get things at a next level, you should consider protecting foreground color if you find it problematic to work otherwise. With Protect foreground color, you will achieve desired results. Bet you, select the option if you want professional results.
For image background removal, background eraser tool works completely fine. It is definitely a flawless tool which will let you save the color of the areas you don’t want to touch while removing other areas of the background.
Remove Background without select Foreground Color
Click on Protect foreground color in Options bar and press Alt key. You will see an eyedropper tool to select the color to be protected.
 Click on Protect foreground color in Options
As you do that, you will see that the foreground color will be changed to the sampled color in the tools palette. Now go ahead to get better results.
 Pick the Protect foreground color
Deselect the Protect foreground color option when you are done with everything.
Voila, that’s it! You did it right. Background removal is a challenging task because it needs precision and skills. With the help of right tools, you can achieve great results. Read the article carefully to get exceptional results.
 Background Removal using eraser tool In Photoshop
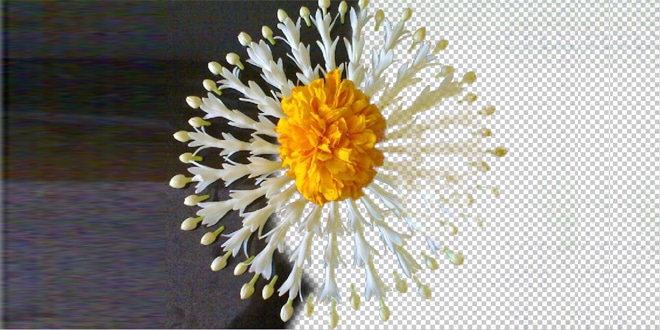
Once when you excel in background removal technique, you can work on any image whether it is simple, medium or complex. After working with background eraser tool, there is nothing hard in using other methods like pen tool and image masking. Since all the background removal methods need expertise and skills, you can do it easily once you master the art of image background removal. Stay tuned for more such informative articles, happy editing!
Select Foreground Color for remove Image Complex background Video Tutorial Bellow

Photoshop tutorial: How to make clipping path / cut out image
The internet has made the world a single place. Luckily for businesses, that means you can outsource your graphic needs, including all your clipping paths, at very affordable prices. Having an outsource it graphic design company 24 hours and 7 days a week at your service, is even better than having your own in house studio.

How to Cut Out Hair in Photoshop CS6
IMAGE MASKING /Cut Our Hair service:
Image masking, is the technique we use, when clipping path is no longer an option. When the subject that needs to be selected has so much detail, such as fur or hair, clipping path becomes very hard to use. In these cases, a technique called Image Masking service is brought into play. Clipping mask, Photoshop mask, image masking, channel masking, alpha masking, layer masking and transparency masking are some of the variations or specialties of this image masking service.
Visits Our Websites:
Clipping Path King ► http://clippingpathking.com/
Remove White Background ► https://removewhitebackground.com/
Product Photo Editing ► https://productphotoediting.com/

photoshop Image Masking Tutorial : Photo Hair Mask

How to cut out hair in photoshop tutorials and services here!! Check it out: http://clippingpathking.com/image-mas... Our Cutting out Hair in Photoshop basic price start from $1 for each image VISIT http://clippingpathking.com/blog FOR MORE FREE TUTORIALS http://clippingpathking.com/ SUBSCRIBE NOW FOR MORE FREE TIPS AND TRICKS We Provides hair cut out , Image Masking service, Image Background Remove,cut out anything in photoshop and image shadow provider for Photographers, Online Retailers, Advertising Agencies. Photo MASKING /Cut Our Hair service:


How to edit Product Photo to sell on Amazon, eBay and Google Shopping

Top 100 Free Stock Photo Sites to Download FREE IMAGES
Top 100 Free Stock Photo Sites : https://bit.ly/2Kzh1AN For e-commerce, there is always the need of high quality images to enhance the appearance of the portal. But it is quite hard to find premium images if you have limited budget. Here, we list down the top sites which provide free stock images to download and upload on your online website. Also, for social media, email marketing, and advertisements, these stock images are really helpful. FREE Top 100 Free Stock Photo Sites : https://bit.ly/2Kzh1AN

Pen Tool to Remove Image Background : https://bit.ly/2Oa1PsD
Product Background Removal services: http://clippingpathking.com
Today’s article is focussed on the usage of pen tool to remove the backgrounds and placing the main object on a new background with better look and appearance. You might have read many articles on the same topic so what is the difference here? Let us see to find out how pen tool works in removing the complex backgrounds. How to Remove Image Background Using Pen tool in Photoshop: Here are the series of steps to follow while removing the background with pen tool in Photoshop: Open the image in Photoshop that you want to use pen tool on. Go to the layers palette and pick pen tool from there. When you will click on any edge of the object, a new layer will be created which is called path layer.
